Sunday 30 September 2012

Primary School Peeks

I attended a planning afternoon at my little boy's school this week, and it was really the best reason not to be at work.

I learnt a lot, all the stuff I was confused about to do with school was cleared up, and I am now fully equipped to be a SUPERMUM!

Here are a few little peeks from around his classroom, they have been studying dinosaurs this week, which I know Ramsey just adores. Yay for school!


I can't believe September is over! It's been a month of big changes, big ideas and blogging. I'll be putting up a round up of my favourite posts from this month tomorrow - why not follow me using Google reader, or add me to your Google+ circle? I'm also on Bloglovin' :-)


Friday 28 September 2012

How To Create An Imagemap and Add It To Your Blog


Image maps are a really great way of giving your blog an extra boost. It's SUPER easy, and I'm going to show you step by step how I created the image map that I am using as my blog navigation menu :-)

An image map is a picture that you can click different parts of to go to different links. It's a good way of making a navigation menu on a blog, because you can use a font that other people might not have, or a series of pictures that suit your design.

1. Set up your image. I created a blank white image in Paint in the size that I wanted my navigation bar to be. Then I saved it as a .PNG file, and opened up the image in picmonkey. Picmonkey is my favourite image editing software as the fonts, customisation options and clipart suits my personal style.


2. Crop your image to within an inch of it's life. You need to cut out all additional white space. The reason for this is - it will be impossible to customise the image after you have mapped it. If you find the spacing of your blog is off after adding your imagemap, you'll need to start all over again. This way, you can always add extra space by using the 'br' tag.

3. Save your image and head on over to the image map tool at image-maps.com. I have used this tool for years, it's really easy and the interface is simple. It also gives you a few neat options. There are other ways to create an image map, like, coding your own. I don't see the point when this tool does all the work for you!

Click browse and select your image from your computers files.


4. Let's start mapping! It's so easy. The screen that loads will how your image and then a selection of options on the right hand side.

You will have the choice of 'rectangle' and 'custom' areas to map. You probably already guessed that the areas will be the linked parts of the image.

I'll be using the rectangle option for this guide. The custom shape is slightly more complex as you map 'points' around an area you want to link, but once you try it out, it should become quite clear.


The rectangle will appear in the top corner of your image. You can simply stretch and move the rectangle to cover the entire area that you want to turn into a link. Then, copy the link you want clicks to go to into the box titled 'link for this map'. Type a short text in the second box. This is what will show up when the cursor 'hovers' over the link. I just put in the same words as the navigation menu.


5. Rinse, lather, repeat. After clicking save, select 'Rectangle' again and a new box will appear. Move, stretch and reposition the rectangle to your second link area. It helps to have your blog up in the background so you can easily find each link you are looking for.

*** The way I 'label' my posts means that I can direct my readers to pages containing only posts they are interested in. Tag all your posts in a uniform fashion. All my nail tutorials are tagged with 'nails'. To find this link, go to the bottom of an entry and click one of the tags. This will load a page showing all entries with that tag. This is the link that I have used in my image map navigation menu ***

6. Uncheck all of the options in the Advance Tool Box (apart from the one about leaving the linkback in. It's only fair, after all - this is a great free tool!) if you don't, you will get a list of text links directly under your image map, which isn't that helpful for a navigation bar.

7. Get your code and upload your image. Click the 'get code' button and you will be presented with a page like the one below with a series of tabs across the top. You only need basic HTML code for most blogs.


You will need to 'host' the image behind your map somewhere else. Photobucket is a fast, free and easy option. You simply sign up, sign in, click the big green 'upload' button, select your image (must be exactly the same image as you uploaded to image-maps. Then just click the 'direct link' section, and your link will be automatically copied to your clipboard. You might want to put it in a notepad document for a second, as you'll need the clipboard to transfer the code to your blog.

8. Copy the entire code...and load up your blog provider. Now, I used Blogger, and the instructions here are just for my personal blogging platform. It should be straightforward to edit your own blog. You are basically looking for the section whereby you can add HTML code into your blog design layout. In Blogger, it's the section pictured below, labelled 'Layout'.


I want my navigation bar to appear directly below my banner. So I have inserted a 'gadget' (a section of coding) and located it underneath the banner section. Do this by clicking any of the 'Add a Gadget' links. You can always rearrange these, that is the beautiful of Blogger and one of the reasons that I like it so much - simple layout edits are always super easy!

When offered the choice of the type of Gadget, chose HTML/JAVASCRIPT and paste your code into the box. See the screen shot below which should make this clearer.


9. Replace the link. Now, go grab that photobucket link. See in the code where it says "img src="http://www.image-maps.com/etc etc"? Replace everything between those speech marks with your photobucket link.

10. Save and admire - Your work here is done. Check that all the links go where you want them to.

I hope this has inspired you to add an image map to your blog! I'd be happy to ask any questions or elaborate on anything that isn't clear in this tutorial, and I love reading comments both positive and constructively critical.

Tuesday 25 September 2012

Sharpie Mug Tutorial

As part of my recent desire to sort my house out, I've been noticing lots of things that I don't have that really, I need. The only mugs I had until today were ones we got with Easter eggs. So I have a Yorkie mug and one with a bunny on it.

I've seen this on Pintrest and also here. So it's not really my idea but I'd like to show you what I did if that's ok :-)


 You will need:

A plain ceramic mug, dishwasher and microwave safe.
A Sharpie
(I told you it was easy!)


 Draw your design all over your mug. I'd recommend not drawing on the parts that are going to touch your hot drinks.  I chose a sweet heart pattern but you can find ideas everywhere. How about a quote you love? Or copy your kids drawing? Or get your kid to draw on it, that would make a fun present for a grandparent!


I didn't do the handle - this isn't a totally fool-proof method and the handle will...get held a lot. Ha. So I thought the design might rub off and also, drawing on the cup was quite tricky. I found the best position was rest the cup on my knee with my left hand flat over the top holding it in place. Try not to touch the design as you move round the cup because it will rub off quite easily or smudge.

If you make a mistake, use a teeny amount of hairspray on a cotton bud (q-tip) to clean up the error.


Put your finished cup in a COLD over and turn the heat up to 300. Leave for 30 mins. Putting it in cold should prevent the mug cracking in the heat but this is why it helps to have a microwave safe mug in the first place.

Open the oven door, turn off the heat and let the cup and oven cool down completely before removing and making yourself a nice brew :-) Hand wash your mug only. The design should stay on, but it will depend in the glaze/coating of the mug you used.

Please feel free to comment if you have any questions! I was super-happy with the comments on my mermaid manicure post yesterday, so thank you for reading *waves*


Monday 24 September 2012

Mermaid Manicure Tutorial

I hope you enjoyed my post yesterday, 5 simple ways to increase your blog traffic. If you missed it, have a look here.

I'm back today with a fun tutorial for a manicure that reminds me of a mermaid. There are some very cute mermaid-specific manicures knocking about on Pintrest, but I've been wanting to try this all-over dotting technique for a while, so here I am giving it a bash. Please feel free to ask any questions!


You'll need:
Three colours of nail polish that remind you of the sea. I've used Barry M 291, Colbalt Blue, Barry M 304, Mint Green and M & S Baby Blue.
A metallic polish. I've used Barry M 319, Foil Effects Silver.
A Bobby Pin bent out of shape
Teeny gems, I've used my trusty Anitas craft gems.

I really dislike the Mint Green, I don't think I'll ever get through the whole bottle. It reminds me of hospital gown colour. But it fit pretty well into this theme :-)


Paint 4 nails with your base colour (your least favourite) and one accent nail in your metallic. I've painted my index finger, I always use that for an accent nail.


Once that's dry, it's time to start blobbing. I've put out dabs of the colours on a piece of plastic.


Dip one end of your bobby pin in one colour. Start by doing three or four blobs across the very top of your nail.


Add your second colour, moving down the nail. Each dot should overlap another, as that what will give you a fishy-tail effect. You will have to wipe the bobby pin between each colour, or use one for each shade.


Use your metallic for the third colour and carry on dotting down the nail.


As you reach the bottom, do a half-moon guide with one of your colours.


 Dot your other colours up to and overlapping the guide, this will kind of hide it so it isn't so obvious.


Cute huh? I think we need a bit of sparkle though :-) Do both hands, you'll need to redo your little pools as the polish will probably go quite tacky after a few minutes.


I tipped out a little pile of gems in the sea colours that I had.


Paint a thick layer of clear polish over your accent nail. Using the other end of your bobby pin, dip it in the clear polish and wait a few seconds. This will make it tacky enough to pick up a gem with the very end, but it won't stick to it. Press the gems firmly into a half-moon using the end of the bobby pin.


The size of your gems verse the size of your nail will have a serious effect on how the final result looks. But you can't control it. So go with the flow and build up some layers of coloured gems. Why not try mixing it up also?


And wa-la! (I really say that, in actual real life.) Paint the whole accent nail with a very thin coat of clear polish and then finish off your other nails the same way.

I hope you like this tutorial! Feel free to post any of my images on Pintrest, but do ensure that they link back to here :-)


Sunday 23 September 2012

5 simple ways to increase your blog traffic


 As you might know, I've moved my blog over from it's old location. I needed a fresh new look. I've been working on ways to increase my readership here, and after a few months of making small changes and keeping a very close eye on my stats, I'm ready to share these 5 simple tips.

1. Properly name your photos. 

If you can honestly say you haven't got a folder on your computer somewhere called 'aaaaaaastufftoday' or something similar, then I think you should stop reading my blog. You just aren't my sort of person. (That was a joke, don't leave, please.)

When you save a photo, try and give it a name that you can imagine yourself searching for if YOU were looking for that particular photo. I always use this little trick. So, for example:


I originally took this photo on my phone, which if you have a phone with a camera, you'll be aware of it ending up with a name like '9091927htc'. Now, I don't know about you, but I don't search for strings of numbers when I'm looking for outfits involving a pink skirt. 

I mentally assign some keywords to the picture. 'skirt', 'fashion' 'going out outfit', 'pink', 'leather'. Then I name the photo with the words that are the strongest keywords - the most likely ones that *I* would search for. If you are taking things REALLY seriously, you can also check out how often the words are searched using Google Analytics. I'll go into more detail on that in a later post.

So I ended up calling it Pink Skirt Fashion Outfit.jpg.

Now, it should come up when people search on Google for different combinations of those words! How far up the listings depends on some other factors, such as back-links, popularity and the mysterious Google algorithm.

2. Keep An Eye On Your Stats.

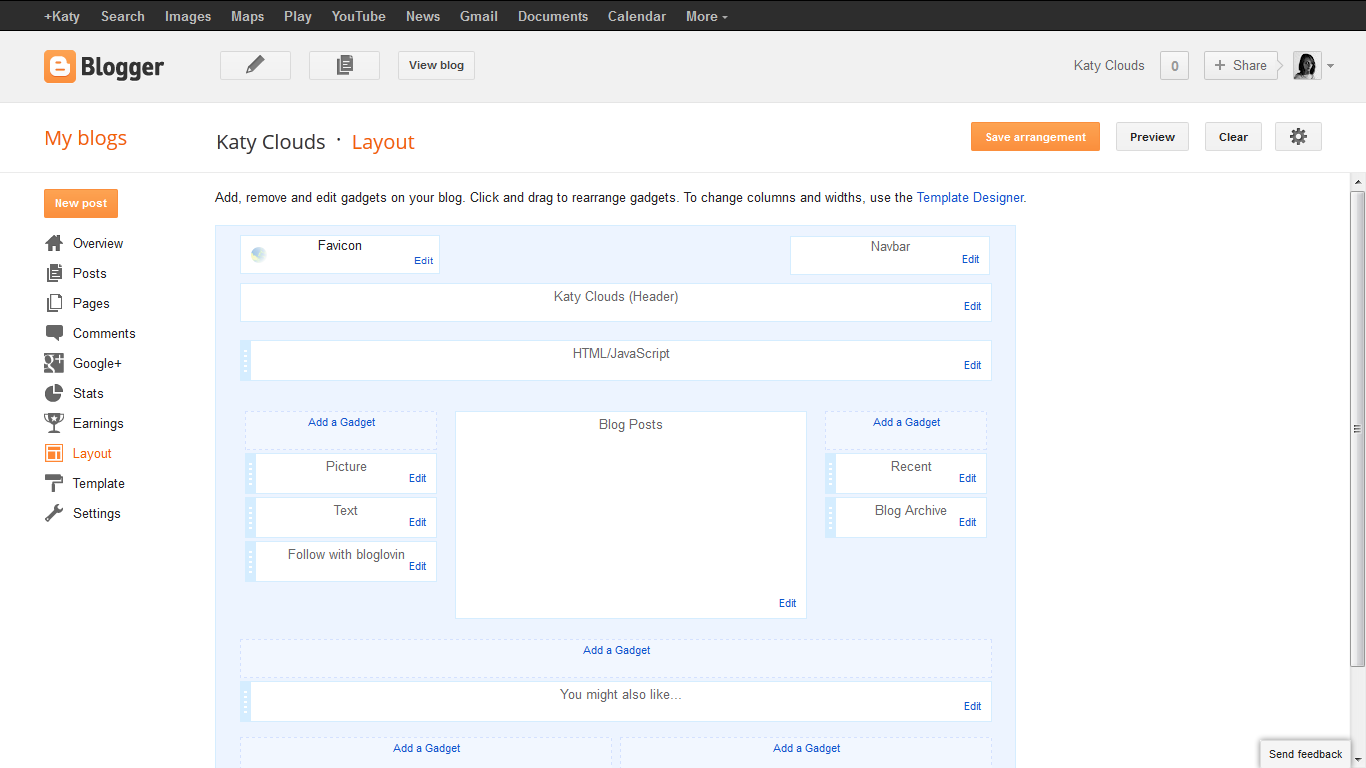
I look at my blog stats every single day. The most interesting thing that I like to view is the Search Keywords feature in Blogger. Other blogging platforms have something very similar and you can also get an even more in-depth set of results by installing Google Analytics.

Here are my stats using the 'Now' option just this very second.

This tells me a lot of useful information. I actually use this information to keep a note of the type of readers that I have. I can see that the majority of my hits today seem to be coming through my blog by searching for an Ombre French Manicure tutorial. I had previously posted one pic of a mani that I did myself. Then when I saw that quite a few people where coming to my blog looking for that, I took the opportunity to post a full tutorial. I'm thinking these people will be much more satisfied when they happen upon a full picture tutorial than just one picture. Maybe they will stay and see my other tutorials. Maybe they will become a follower.

I can also use this information another way. I know that nail tutorials are super popular and lead to blog hits. Coupled with the fact that I actually like doing them, they seem to be a great content idea for my blog :-)

**I would never recommend posting things that don't interest you just to get hits. I like doing nail tutorials. I wouldn't do them otherwise. If I did, blogging would become a chore. And it's meant to be fun. So, the key is to rationalise what your *readers* want, and what *you* want and find where those things overlap.

I love a good Venn diagram.

3. Post Titles.

Post titles should be descriptive not cryptic. I've seen a very strong correlation between higher page views and keyword-filled titles. This also applies to labelling your posts.

4. Linking posts internally.

  
45 views today have come from my old blog. That's cool. I can handle that. And then you see that another 30 people have swung by from other posts. I like this.

There are a couple of ways you can link your own blog without sounding like you are rampantly self-promoting. 
  • A monthly or weekly round up of your favourite posts. This is great for reusing images, getting those keywords in, and also for reminding new readers about things they might have missed.
  • Use a widget such as linkwithin to add a bit at the bottom of each post suggesting other articles within your blog that the reader might like
  • Simply mention and link - "After we had a bonfire last week it got me thinking about Bonfire night..."
5. Pintrest & Twitter

I have over a 1,000 followers on twitter. You can read more about how I did that here (See what I did there?) I have twitterfeed set up so that every time I post a blog post, it automatically posts the link to twitter in the same format:


 Since I normally post quite late at night, somethings not all my followers will see the post. So I like to log in a few hours (usually the morning after) and post another link in a different way too.

Sign up to twitterfeed here. It's super simple and there are step-by-step instructions. Don't be afraid just because it involves RSS feeds, it really is very easy to set up.

In particular with my nail tutorials, I will post a few photos on Pintrest. I have a board called 'Social Media', so the hand photo at the top will be pinned to that, linking to this blog post. Hopefully, people will find the post interesting enough to want to 'pin' the image to come back to later. (I've learnt that with blogging, you need to have faith in your own ability to be interesting. This is probably the hardest thing to get your head around, well, it certainly was to me.)

***

So, there we have it. I really hope that one or two of these easy tips will be useful to someone, and if you have anything to add, or have a question, or just want some personal help with anything that I have written here, please feel free to comment below and I will do my very best to help you out, if I can!

Saturday 22 September 2012

Bonfires and sweet boys

We had a little bonfire this evening to get rid of some garden waste, and it was the first time that a certain sweet guy has seen a big fire up close. He was fascinated. I should add that I did ensure he was a good few feet away from the fire at all times. I'm kinda scared of bonfires anyway, my amusing fire of choice is fireworks, for which the season is nearly upon us, yay!

I snapped these two photos, sorry to be such an Instagram slut, I promise better photography very soon, I just need to sort some batteries that don't die within 5 seconds.


So serious <3


Our 'garden' is really a concrete slab down some steps and up an overgrown path. It's pretty good for bonfires and letting the dog pee, but pretty awful for anything else. I am desperate to move, and seeing lots of bloggers making house moves recently has got me in the mood! I'm going to spend the winter fixing up our little flat - we are in urgent need of a bunch of new doors as the ones that came with the house have all got panels and handles missing. It's getting me down. I'm going to start on one room and work my way through the house. I fully blame Pintrest for this sudden nesting instinct.

You could have a look at my Home Inspiration board here.

When I went to get the link, I had a quick scroll over my pins, and I clearly have a thing for fantasy bedrooms. Right now, my bedroom has the worlds most uncomfortable mattress, a bright green carpet that we 'borrowed' at the end of an exhibition, but that isn't actually fitted, just cut around the furniture, two broken and overflowing laundry baskets and a TV that I am pretty sure was manufactured around the time television was invented. Seriously, the back extends so much that I'm pretty sure it's longer than it is wide.

So that all needs sorting.

I'm dreaming of pale grey walls, a soft mattress, a fitted carpet and sweet dreams under a four poster bed

Please swing by tomorrow, when I'll be sharing a new tutorial :-)

Friday 21 September 2012

Ombre French Manicure Tutorial How-To

A month or so back I posted this picture of an Ombre French Manicure that I tried.It's proved quite popular on Pintrest...(follow me here)...so I thought as I have suddenly found myself with much less to do in the day that I'd post a tutorial - I hope you like! As I have said before I love love love reading comments, whether complimentary or constructively critical. (I can take it. I'll only cry into my coffee for like, 2 days)


Supplies: Make-up sponge, French Manicure Pink by Collection 2000, White by NYC.


Paint one very thin coat of pink over bare nails. French Manicure pink is usually very, very thin and it's easy to get streaky. Try and get as even a coat as you can!

 
 Blob two short lines of nail polish onto a plastic base. I've used a small storage box lid. Be careful, because nail polish can melt some things with shiny, laminated coatings and will pick up a lot of it's colour. I found this out when I tried to use a sweet wrapper. 

Using a pin or earring or old fork tine, mix the two colours where they meet. The more you mix, the better gradient effect you will have.


 Press a small, dense sponge down on the polish. You need to move quickly here because the polish will dry and go tacky. Push down gently a few times to encourage the sponge to pick up all the polish.


Press the sponge down on your nail. Try to cover 2/3's of the nail. You might need a few extra dabs on the sides. Don't worry if you get some on your skin, because you can always clean up after with nail polish remover and a small brush.


Looks pretty messy huh? Don't worry! Where you see a stronger line that doesn't seem gradienty enough (I totally made up a word) you can dab your sponge lightly over the area to increase the blend effect.


Messy!


Next, dip your sponge in the remainder of the white polish and dab carefully over the tops of your nails. This will give you the pure white - to - pure pink look.


Immediately paint another very thin layer of the pink over the whole effect. 


And you are done! I think I could have done with a few more dabs of white but overall I'm really happy with my nails right no, it only takes a little while, because you can paint each new layer straight away!

I'm off to the adventure playground now to play pirates with a small noisy fellow. I hope your Friday is just as fun. x


Wednesday 19 September 2012

I have an idea...

..sometimes you are lying on your mattress in the front watching Lost on Netflix when you have a pinging idea pop into your brain that stays with you all the next day. When you can't shake the idea away, it's time for action. It's the best feeling. And now, I have a plan. And I am going to implement my plan in just a few short days.

I'd love for you to come with me on a journey...follow me on twitter here.


Similiar Posts...